The product recommendations on our site are independently chosen by our editors. When you click through our links, we may earn a commission. Thanks for helping us do what we love. Learn More
Tube baits have earned their place as one of the most effective lures for targeting smallmouth bass, especially in rivers and current. But while tubes are simple in concept, rigging them correctly is what separates a frustrating day from a productive one. In this guide, we break down the exact tube rig setup we use at Boundary Voyage — including internal eyelet sinkers, hook placement, and common rigging mistakes that can ruin your presentation. This post accompanies the video above and focuses entirely on setup and rigging, so you can build a tube rig that glides naturally, stays snag-resistant, and looks right to feeding smallmouth.
Why Tube Rigging Matters for Smallmouth Bass
Tube baits imitate crawfish, gobies, and baitfish — all primary forage for smallmouth. However, poor rigging kills the action. A tube that’s bent, kinked, or weighted incorrectly won’t glide or fall naturally, especially in current.
A properly rigged tube should:
-
Fall straight
-
Glide naturally in current
-
Keep the hook positioned for solid hookups
-
Stay relatively weedless and snag-resistant
That’s exactly what this setup is designed to do.
The Tube Rig Components
This setup uses simple, affordable components that work extremely well together.
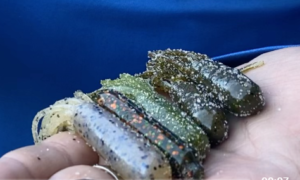
1. Tube Bait
Choose a quality soft-plastic tube with enough plastic in the head to hold an internal weight securely.
Recommended colors:
-
Watermelon (excellent year-round)
-
Green pumpkin with fleck
-
Lighter green tones
-
White or white-speckled (especially effective in deeper pools or slower bites)
Color matters less than rigging correctly, but changing colors can make a difference when fish are pressured.
Here are my favorite Tubes from Bass Pro.
2. Eyelet Sinker (Internal Weight)
Instead of a traditional tube jig head, this setup uses an eyelet sinker, which is:
-
Affordable
-
Versatile
-
Easy to position inside the tube
In this setup, the sinker is placed toward the front of the tube, but still suspended internally. This creates a controlled glide rather than a steep, nose-down fall — ideal for fishing in current.
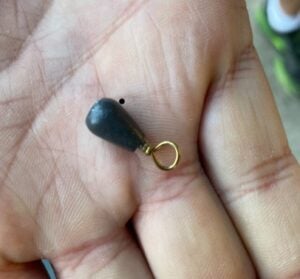
You can experiment with moving the weight back using spacers, but for river smallmouth, this forward-centered placement works extremely well.
3. Hook Selection
A wide-gap hook works best here. In the video, a size 1 hook is shown, though a 2/0 hook may be a better fit for slightly larger tubes.
The key is ensuring:
-
The hook runs straight through the tube
-
The hook point exits near where the skirt starts
-
The hook lays parallel to the tube body
Step-by-Step: How to Rig the Tube
Step 1: Insert the Eyelet Sinker
-
Push the eyelet sinker into the head of the tube
-
Work it all the way inside the tube
-
Feel for the eyelet through the plastic
The sinker stays completely internal — you won’t see it once rigged.
Step 2: Thread the Hook Through the Eyelet
-
Run the hook through the eyelet of the sinker
-
The hook and sinker are now linked, but still free-moving inside the tube
This suspended setup is what gives the tube its natural glide.
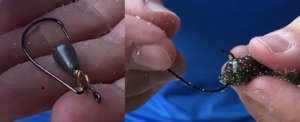
Step 3: Exit the Hook Through the Tube Body
-
Bring the hook down the side of the tube
-
Push it out near the start of the skirt
-
The hook should sit snug and parallel to the tube
At this point, you’ll see the eyelet positioned correctly inside the head.
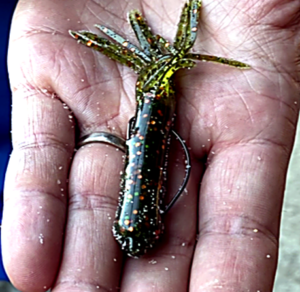
Step 4: Make It Weedless
-
Lightly bury the hook point back into the plastic
-
This keeps the rig snag-resistant without hurting hook-ups
Check this periodically while fishing, especially after snags or missed bites.
A Critical Mistake to Avoid: Tube Kink
One of the most important tips from the video:
👉 Your tube must be straight.
If the tube bends or curves:
-
The hook is positioned incorrectly
-
The bait won’t fall or glide naturally
-
You’ll get fewer bites
If you see a curve:
-
Pull the hook out
-
Re-rig it
-
Adjust the exit point slightly
A straight tube = a correct tube rig.
Tube Color Tips for Smallmouth
While rigging is the priority, color still matters:
-
Watermelon & green pumpkin: reliable year-round
-
Speckled patterns: great in clear water
-
White or white-speckled: effective in deep pools or slow presentations
If the bite feels slow, don’t be afraid to change colors before changing locations.
Final Thoughts: Keep It Simple, Keep It Straight
This tube rig is:
-
Affordable
-
Highly effective
-
Easy to repeat once you learn it
The biggest takeaway isn’t the exact hook size or color — it’s rigging the tube straight and clean so it behaves naturally in the water.
Want My Secret Smallmouth Bass Lake Only Accessible By Kayak?
Check out my post: Secret Smallmouth Bass Lake Near Ely, MN
Happy Fishing!

0 Comments